How to use CT Rangepilot
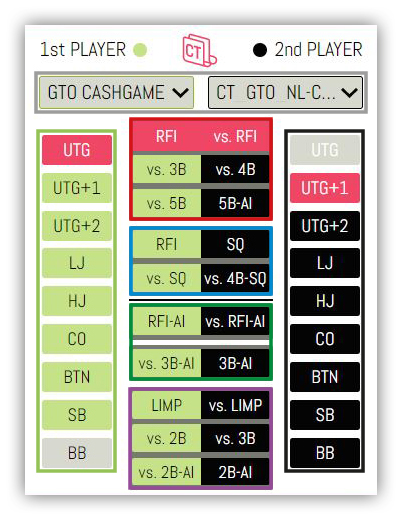
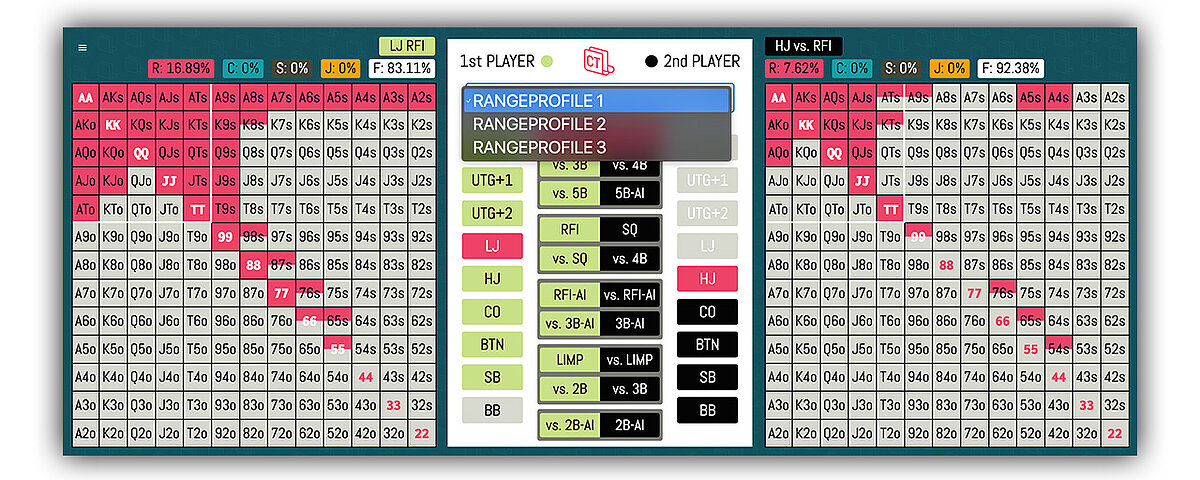
Tool explanation
Upper row (grey border): Select fitting profile
Left (light green border): Position of player 1
Right (black border): Position of player 2
Center, block 1 (red border): Standard situations for cash games and MTTs.
Center, block 2 (blue border): Situations for Squeeze vs Squeeze.
Center, block 3 (green border): Special short-stack MTT situations. If your stack is shorter, part of the strategy is for the first player to go all-in (RF-AI), instead of raising normally or player 2 3-bets all-in (3B-AI) instead of 3-betting normally.
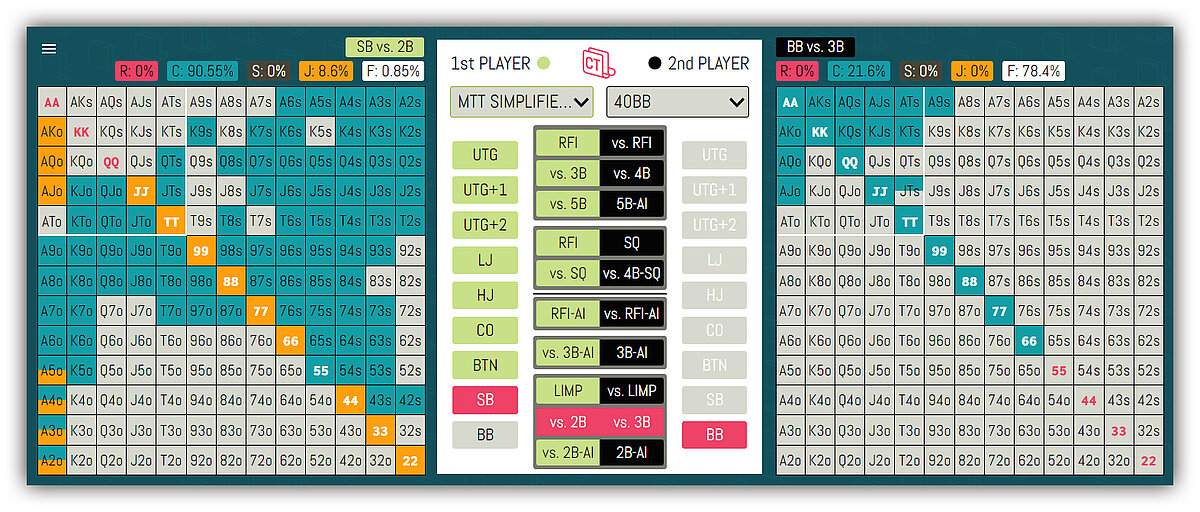
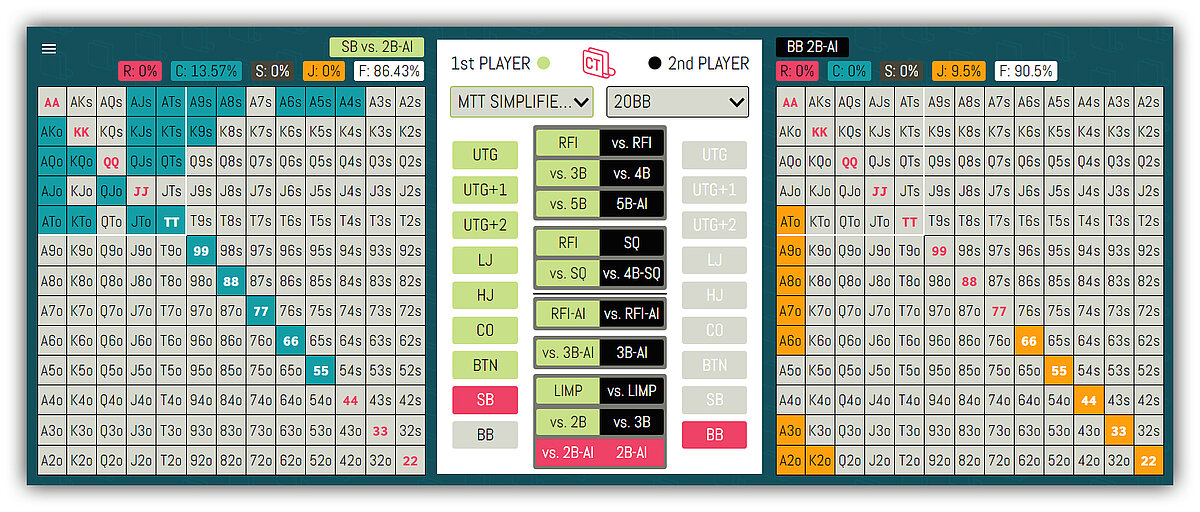
Center, block 4 (purple border): Blind vs blind situations. In MTT part of the SB strategy is limping (LIMP). The BB reacts with a raise (2B) or with all-in (2B-AI) with shorter stacks or checksback.
Abbreviations
SQ, Squeeze: A Squeeze is a 3-bet vs 2 players (a raiser and a caller)
RFI, Raise First In: First action on the table (no limps before, usually between 2BB and 3BB)
RFI-AI: Raise first all-in
2B: Single raise
2B-AI: A single raise but all-in (shorter stacks)
3B: A second raise
3B-AI: A second raise but all-in (shorter stacks)
4B: a third raise
5B: a fourth raise
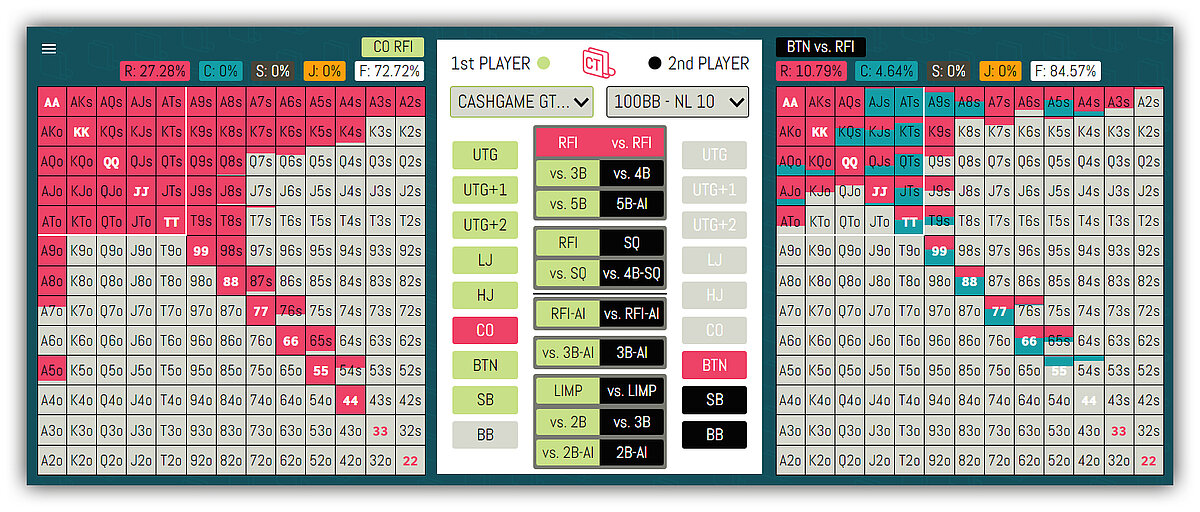
Example 1
Cashgame 6max 100BB
Image 1:
Player 1 raises in CO and player 2 is on the BTN.
If the BTN decides to call or fold, the prefold situation is over for them.
If Player 2 decides to further raise (3-bet), we continue below.
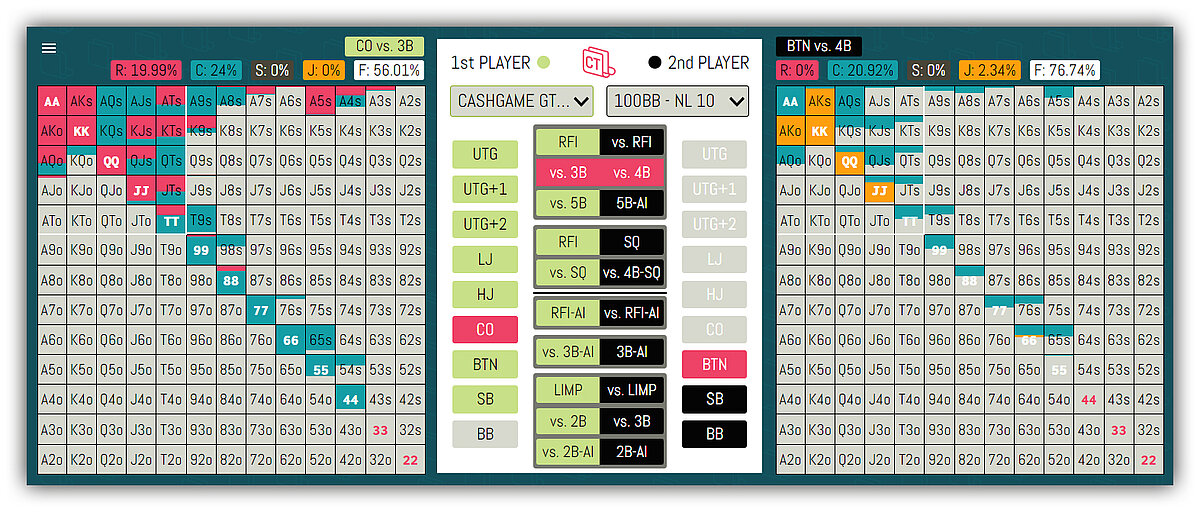
Image 2:
If Player 1 is facing a 3-bet (vs 3-bet) they can call or raise again (4-bet).
Player 2 can call against a 4bet or raise again (5bet), which represents an all-in or jam (J) with 100BB.
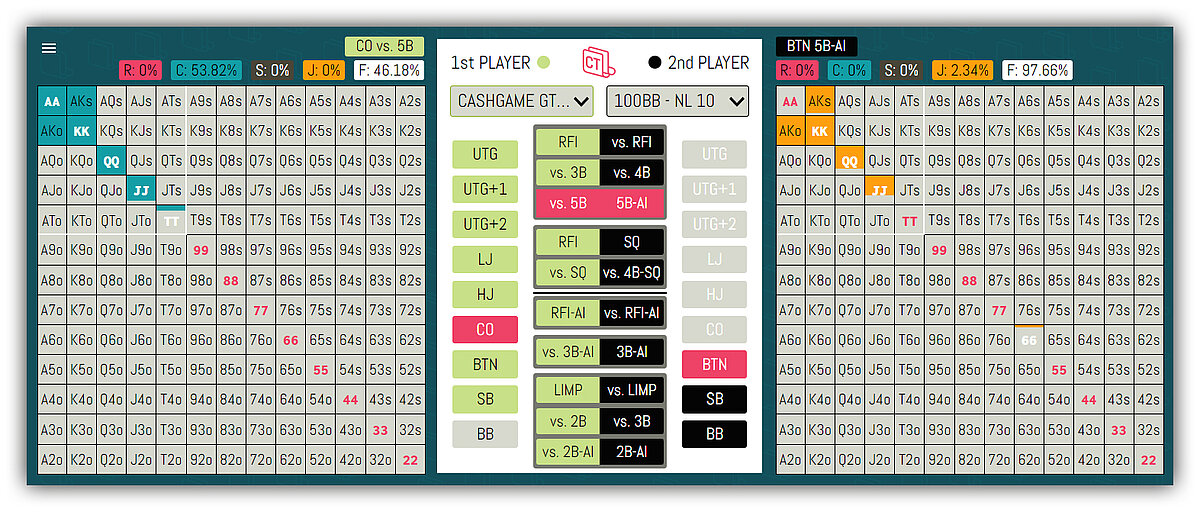
Image 3:
(vs 5b) Now, player 1 can only call or fold.
5B AI again shows the range that player 2 should go all-in with.

Example 2
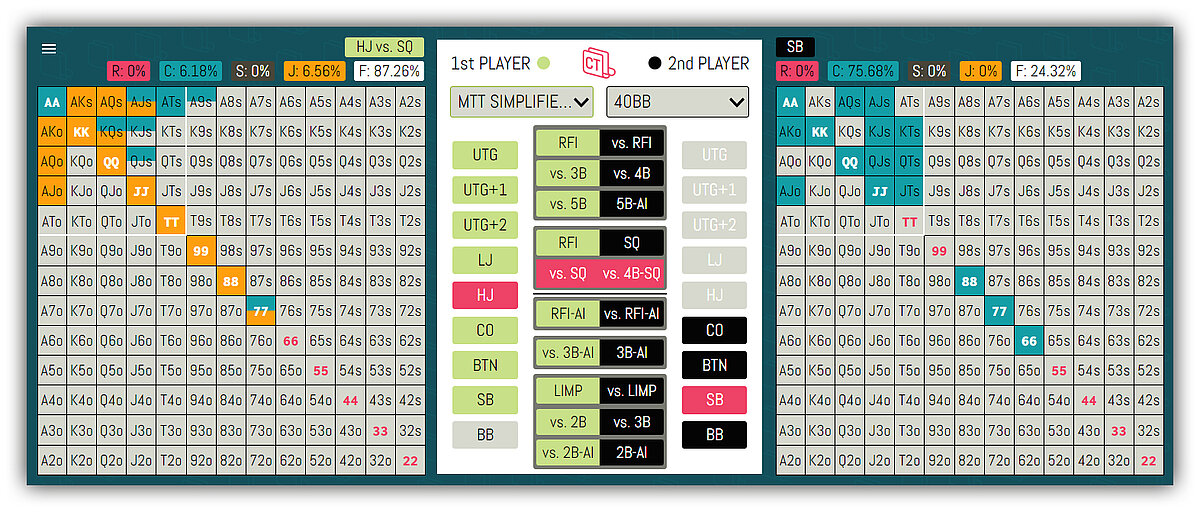
MTT 9max 40BB
Image 1:
HJ (Player 1) raises and BTN (Player 2) calls.
SB (Player 3)* squeezes normally or directly goes all-in as Squeeze.
Vs a Squeeze which is not AI, HJ (Player 1) can call or 4-bet.
*Note: Our Range Viewer is built to show heads up situations. So fitting in Squeeze situations where 3 players are involved is very difficult and no all scenarios can be shown. However, a lot can be shown and is very handy to have.
- Since position of the coldcaller can't be set, we used the position in which the coldcalling range is highest.
- In MTTs there are a few stack sizes where the Squeeze strategy is not only squeezing to a normal size but also squeezing All-in. For those scenarios, only the response against a normal Squeeze can be shown.
- The response of the coldcaller vs a Sqeeze can't be shown.
Example 3
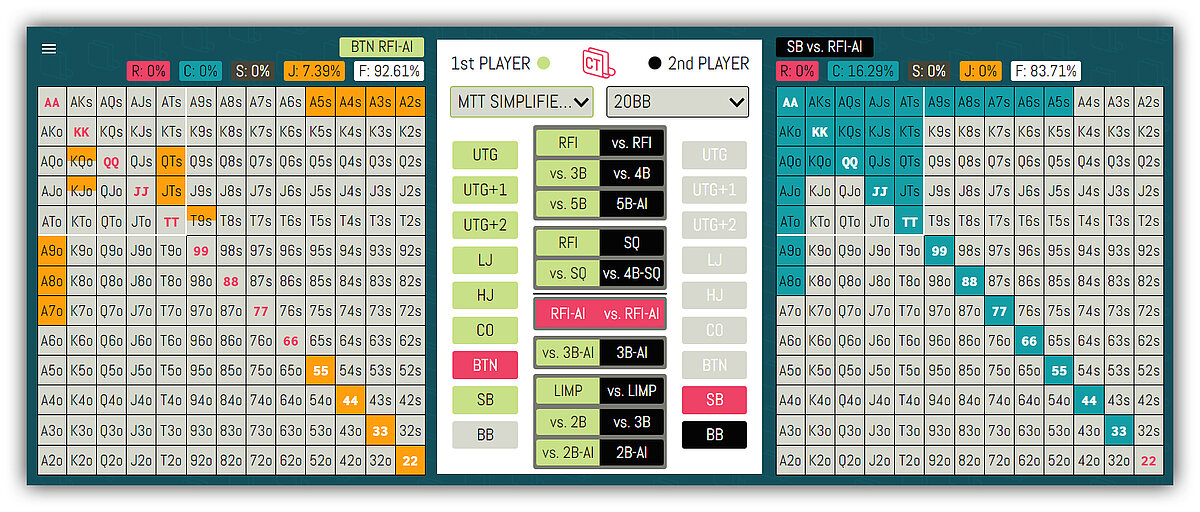
MTT 9max 20BB
As mentioned, player 1 has an open jamming range in shorter stacks (RFI-AI).
This means that hands that are usually raised normally now immediately go all-in instead.
This scenario is described here.
Example 4
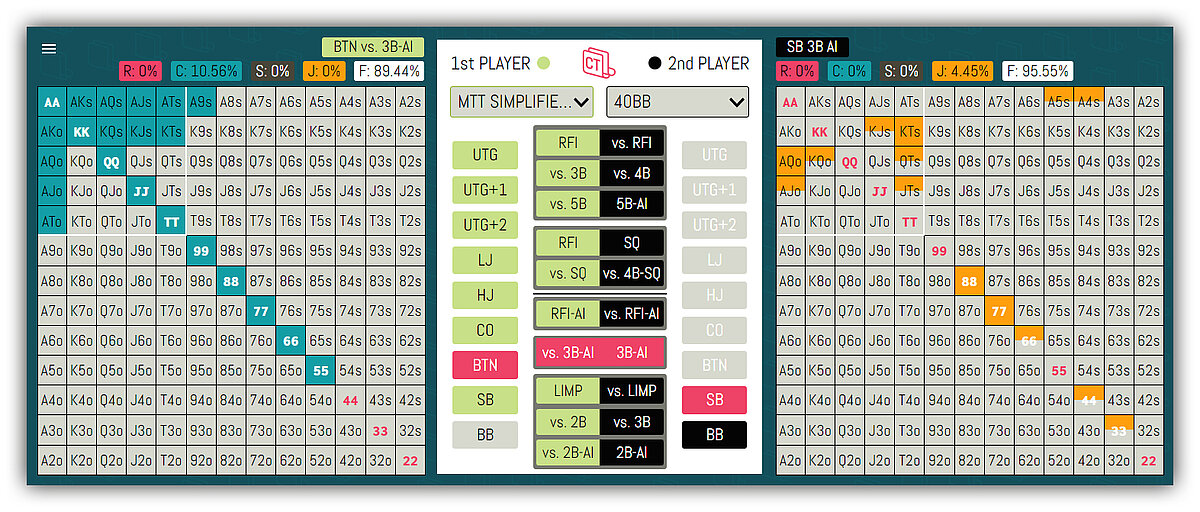
MTT 9max 40BB
Player 2 also has the ability to go all-in as a 3-bet (3B-AI) with a shorter stack instead of 3-betting normally.
Example 5
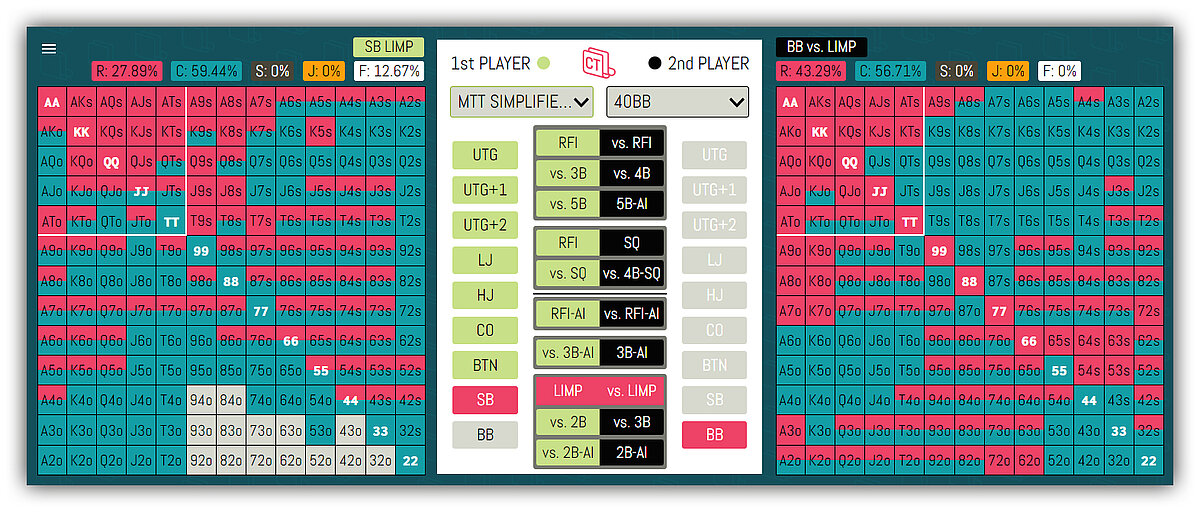
MTT 9max 40BB
Blind vs blind scenarios can be found in the fourth block.
Player 1 on SB should limp many hands (Call, -C).
Player 2 on the other hand can check behind or raise (2B).
Example 6
MTT 9max 20BB
With a shorter stack, the BB should also go all-in directly (2B-AI) vs a Limp, instead of only raising.
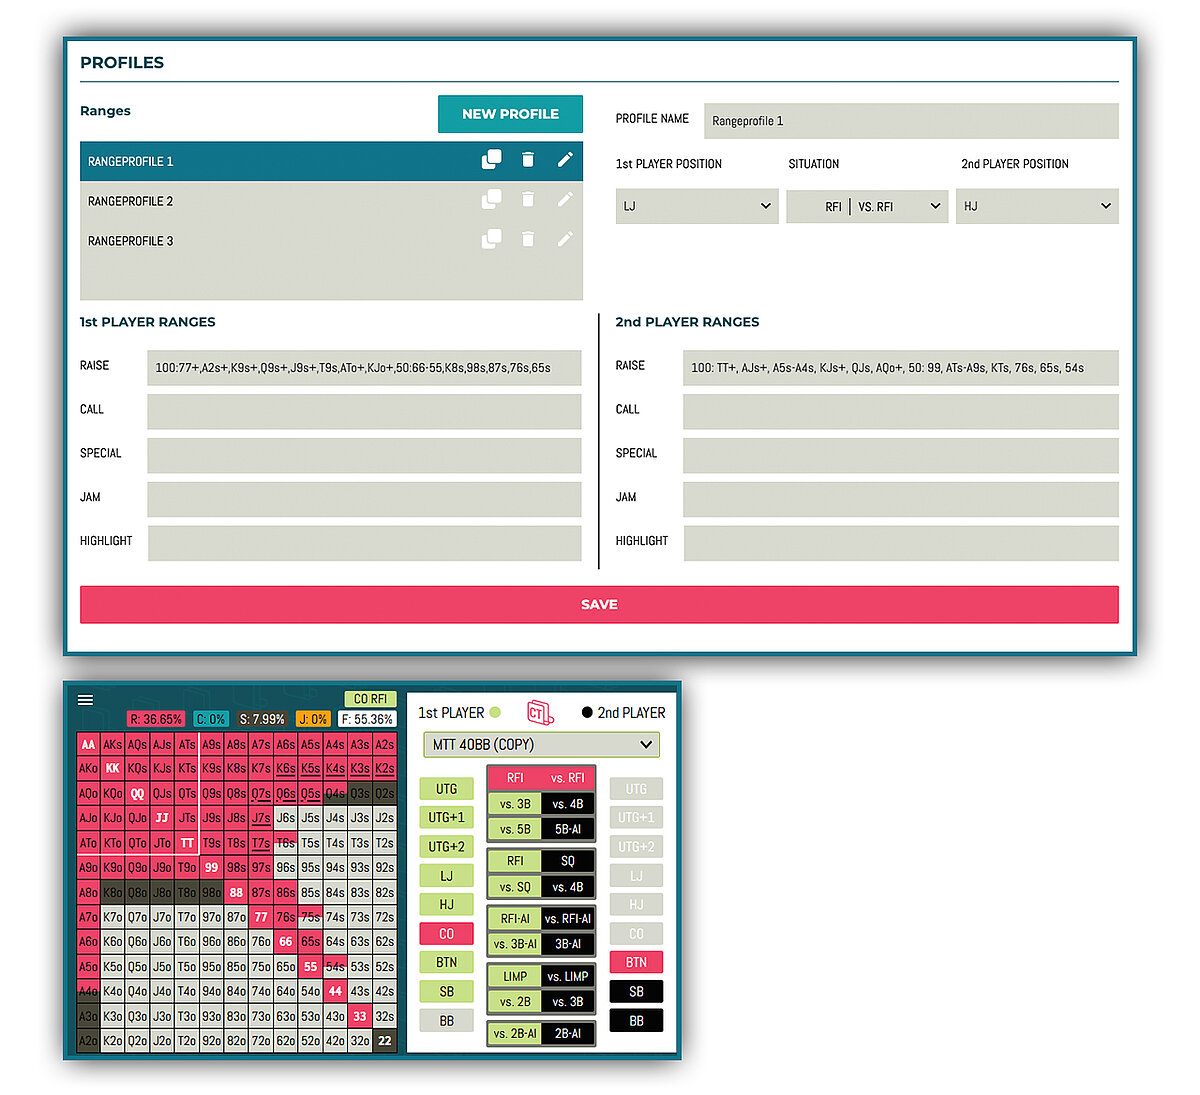
Profile & range administration
- More than one profile can be added and managed
- You can change the order of the ranges to your liking
- Ranges can be adjusted by adding or removing any hand combinations you like
- Range formatting follows the same format as equilab, including weights
- Depending on your situation, you can add the desired ranges and adjust them
Ranges explained:
- RAISE:
- CALL:
- JAM:
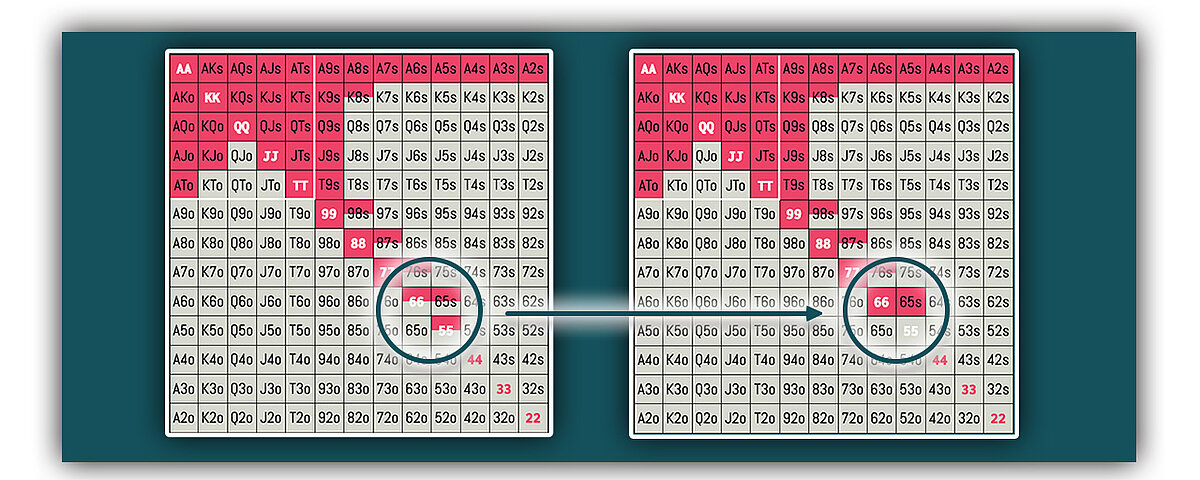
- SPECIAL: You can add hand combinations to your range while still being able to see the original range.
- HIGHLIGHT: This is technically not a range, but more a way of highlighting specific hands. For example, the specific hands you tend to forget or focus most on while studying a specific spot.
- We have noticed, that we can openraise looser at CO (combos in special range) and that the underlined hands tend to forget to raise (highlighted range).
- See an example image next to this text.
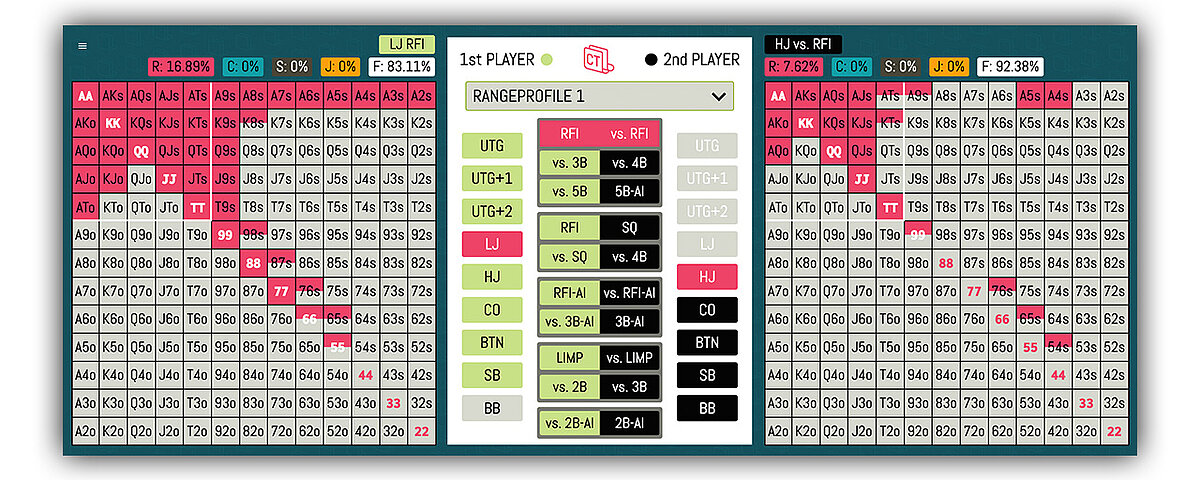
Range Viewer
- Left: Player 1 ranges
- Right: Player 2 ranges
- Change your profile with the dropdown element in the center (second image)
- Percentage calculations of ranges and subranges can be found above each grid
- With 3bet, 4bet, 5bet the percentages are calculated from the previous raising-range
- With squeeze, the range is oriented on the RFI, no matter where the caller is sitting
Randomizer
With split hands, e.g. 50/50, a randomizer colors the hand you clicked on in the range color, depending on wether the hand should be played or not
Watch our Videos!
Learn more about the CT Rangepinlot and how to use it properly on YouTube www.youtube.com/@converttheory
GTO ranges vs. GTO-based ranges
The pure solutions of preflop solvers are called preflop GTO ranges. However, solvers have far more processing power than a human brain, as those solutions are very complex, almost impossible to remember for a human player.
In order to be perfectly balanced, a solver would perform a certain action with a variety of hands even with a very low frequency.
If someone plays a perfect GTO strategy while the other player deviates from the perfect GTO response, the 2nd Player will always lose.
GTO based ranges are GTO ranges that are simplified in order to remember induvidual combos easier, while still using the correct frequencies.
If two or more players with perfect strategies play against each other, poker is a zero sum game – if no rake is taken. Solvers nowadays are capable of playing close to play-perfect strategies, which is usally refered as GTO (Game Theory Optimal) poker. Thus, the ranges the solver uses are GTO ranges.
Poker decisions are always based on mathematics. What matters is the risk to reward ratio - how many chips you risk in order to win the pot.
Important: Even highly exploitive plays are mathematical decisions: for example, if someone never bluffs, it doesn't make sense to call with a marginal hand, because you will never win.
Poker decisions usually affect a player's win rate in more than one way.
Extreme example: If someone only goes all in with AA (a complete nit) while you don't know it and call the all in with an appropriate strong holding from a GTO range like QQ, you will still profit in the long run against this player.
- The nit misses a ton of value from a variety of other strong holdings which makes a good profit in the same situation.
- People will quickly realise this poor strategy and stop paying this player off with strong hands. So the player loses a ton of value from his premium hands.
- The nit also misses the value of appropriate bluff hands.
- Even with AA vs. QQ the player will win only 81.5% of the time and not 100%.
- GTO based preflop ranges are always plus EV to play. However, if you have strong reads about a player pool or a specific opponent, exploitive ranges have a higher EV.
- If you use fundamental strong GTO based ranges, no one can exploit you - especially useful if you play verses unknown players.
- If you spot a leak in your opponent's game, you need to understand how far they deviate from the perfect strategy in order to make the most EV adjustment. Again, GTO based ranges give you the answer.
- If your preflop play is too passive and easy to read (cold calling a lot, 3-betting only premium hands, …) you give up a lot of EV and even not-so-strong players will pick up on it and exploit you.
- Using GTO based preflop ranges makes it easier to navigate postflop through the hand, thus maximising your value.
- As said before, GTO based ranges are not exploitable, so if you don't have any clue about your opponents or the player-pool you play in, it's a guaranteed way to win and not get exploited.
- The better you understand GTO based ranges, the easier it will become for you to profile your opponents and make correct adjustments.
- Prevents you from tilting. People who are tilting are no longer capable of making logical decisions. Their decisions become 100% emotional. This often happens when players are unsure of what to do. E.g.: facing a lot of aggression from a particular player.
- Knowing the GTO response provides you with the certainty that no matter what your opponent is doing, you are responding in a plus EV way.
Betsizes and rake definitions
Betsizes Preflop:
- RFI - 3bb (+1BB for limper)
- 3bet IP - 9bb
- 3bet OOP - 10bb
- 4bet IP - 21BB
- 4bet OOP - 23BB
- 5bet - All-in
Betsizes Postflop:
- 75% pot size
- 50% pot size
- 33% pot size
Rake (wind2day NL10):
- 3.03% rake
- €1 rake cap
Rake (wind2day NL50):
- coming soon...
- coming soon...
Rake (wind2day NL500):
- coming soon...
- coming soon...
Rake (Pokerstars NL10):
- coming soon...
- coming soon...
Rake (Pokerstars NL50):
- coming soon...
- coming soon...
Rake (Pokerstars NL500):
- coming soon...
- coming soon...
Betsizes Preflop:
- 5BB - 10BB
- RFI - All-in only
- 15BB - 20BB
- RFI - 2BB
- RFI-SB - 3BB
- RFI - All-in
- 3bet - All-in
- 30BB
- RFI - 2BB
- RFI-SB - 3BB
- 3bet-IP 3x
- 3bet-OOP 3.5x
- 3bet BB vs. SB - 2.5x
- 3bet - All-in
- 40BB - 60BB
- RFI - 2.3BB
- RFI-SB - 3.2BB
- 3bet-IP - 3x
- 3bet-OOP - 3.5x
- 3bet BB vs. SB 3x
- 3bet - All-in
- 80BB - 100BB
- RFI - 3BB
- RFI-BU - 2.5BB
- 3bet-IP - 3x
- 3bet-OP - 3.5x
Betsizes Postflop:
- 75% pot size
- 50% pot size
- 33% pot size
Antes:
- 13%